Basics of stop-motion animation
Introduction
Stop-motion animation is a simple way of making animated films. By gradually moving objects against a backdrop, and taking photos at each stage, you can create the illusion of continuous motion.
In this chapter we will show you how to produce a stop-motion animation video – whether this is with a photo camera, smartphone, webcam or camcorder in photo-camera mode. You’ll learn to set up and shoot the video, and to carry out the post-production process on a computer, tablet and even a smartphone.
| |
Vision in action |
|
|
Before shooting:
|
||
Equipment and tools
- any type of camera that can produce individual digital photographs
- a tripod, lights (a desktop light or professional filming lights), a table or space on the floor, something to cover the windows with.
- for 3D animation: modelling clay, paper or any other material out of which you can build your figures and miniature film sets. Or you could use readily available toys and backdrops.
- for cut-out animation: paper, coloring pencils and scissors
- a computer, tablet or smartphone for post-production, with an animation- or film-editing programme. You may need image-editing software too, to help you edit the individual photos if necessary.
- a sound-recording device, for any voice-overs, sounds or music you want to create.
Main section
Stop-motion animation goes back all the way back to the early days of film-making. And it’s still a great way to tell stories and express your creativity.
Stop-motion is an opportunity to create a film with many ‘actors’, great film ‘sets’, ‘stunts’ and special effects. You have maximum control over the process, and you don’t even have to leave the room.
Video: Cutout animation (2D): AKVARIJ (by LIJAmedia)
But the usual stages of film-making – writing a script and/or a storyboard, shooting and post-production – apply here as well. And you’ll be using the camera in the same way – zooming, panning, focusing and applying the rule of thirds. That’s why working on a stop-motion animation is ideal training for the production of a feature film, documentary, music video and so on.
There is a lot to prepare, and creating the figures, props and ‘set’ in particular is a challenging process. You’ll need to be very disciplined and stay focused.
There is a variety of specialist stop-motion-film software you can purchase. This lets you capture images and send them directly to the computer while you’re still shooting. Advantages of using specialist software include being able to view the camera output while you’re filming and see the differences between adjacent images using an overlay function.
In this chapter we focus on producing stop-motion animation by taking individual images and combing them using free and readily available film-editing software. This helps you keep costs down and means you can get started on your project quickly and easily.
Typical production process of a stop-motion animation film
The production of every stop-motion film starts with a choice between the 2D cut-out style, which mainly uses paper, and the 3D style. Both styles have advantages and disadvantages.
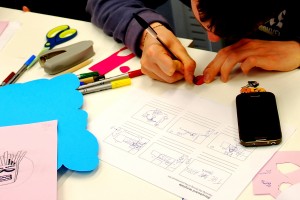

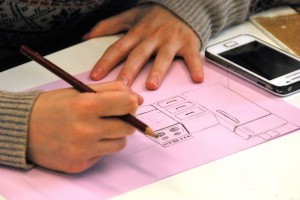

The basic steps of 2D stop-motion animation: writing the storyboard (top left), drawing and cutting out the backdrop and figures (top right and bottom left), and taking the photos
If you want to make a 3D stop-motion film, you’ll need to create your figures, props and the film set using modelling clay or a similar material. Even if you use toys, in general shooting will be much more time-consuming than for a cut-out animation.
For a 2D film, you only need colouring pens, scissors and paper. But a good drawing or painting takes time and skill. For example, depending on the look you’re after, you might have to learn to draw in a way that gives a sense of perspective.
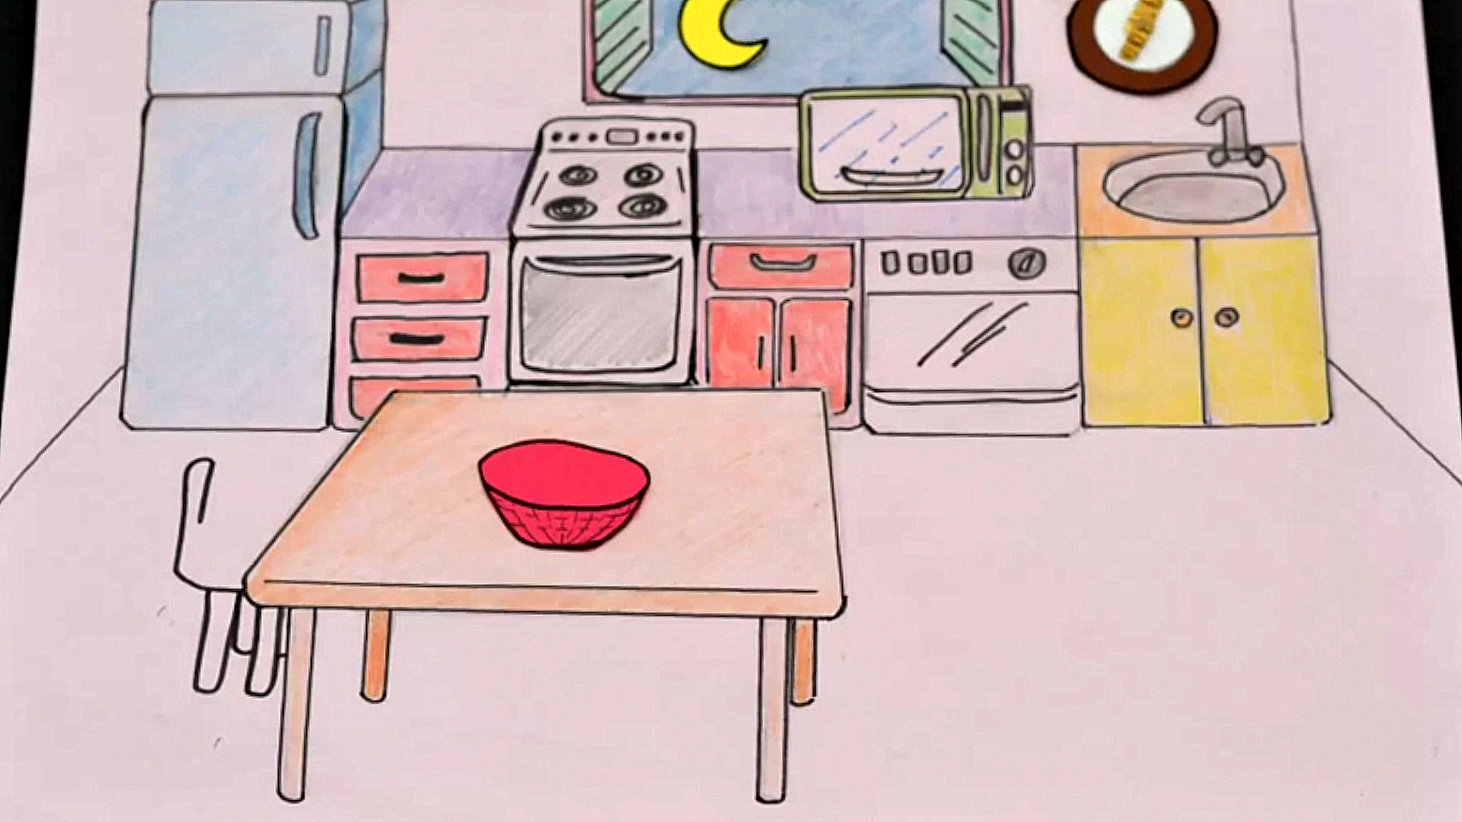 Kitchen backdrop drawn in perspective (a still from the cut-out animation film ‘We are what we eat’ from the project CROSSCuT)
Your choice between the 2D and 3D approach will depend on your vision for the film. And you might want to consider a third option – using a mixture of the two styles. This can create an interesting 3D effect:
Video: STVARJENJE (LIJAmedia and ČMC Bežigrad)
Writing a script and/or storyboard
Before you start ‘filming’, you’ll need to decide whether you want to work with a script and/or storyboard, or the story should develop spontaneously during the shoot.
If you want to base your animation on a story, you have a couple of options. You can choose a story you already know, for example a fairy-tale, and develop a storyboard out of that, or you could come up with your own idea yourself. Either way, referring to Writing a synopsis, script, storyboard and shooting schedule will help you at this stage of your project.
One of the things to think about for your storyboard is how you’ll present speech. You can use slides with dialogues on them, between the animated scenes. There could be speech bubbles, like in a cartoon – especially for cut-out animation, but for 3D films too. Or you can record speech and a narrator’s voice-over at the post-production stage.
At this stage it’s also good to start thinking about the sounds and music you want to use.
Preparing for the shoot
- Draw or construct the figures, props and miniature set.
- Prepare the backdrop. This should be large enough to allow you to take photos not just from a 90° angle (facing the scene straight on), but also from the left, the right, or using a high or low camera angle if necessary. It’s best to shape your backdrop as a half-pipe so that it curves around the figures and props, allowing you to shoot from different angles. Or you can move the backdrop whenever you change the camera angle.
- For a cut-out animation, the backdrop can just be a large sheet of paper that’s been coloured or illustrated in some way – for example showing a forest.
- You can make backdrops for 3D productions in the same way, or using clothes and coloured paper.
- Choose a room that can be darkened completely by placing cardboard or dark clothes over the windows. There should ideally be no natural light in the room, as this can change and interfere with the quality of your images.
- Build the film sets on the floor or on a table. Using a table means you can sit down during the shoot if it takes too long.
- Set up your lights. Use the sort of lighting settings described in Basics of lighting, or otherwise make sure the room is brightly lit. You might want to use reflected light too – for example by directing one or more of the lights at the ceiling; the light will be softer when it illuminates the set. Finally, make sure neither your equipment nor the crew are casting any shadows over the scene!
Start shooting
- Place the camera on a tripod and arrange the lights. Use a pen to mark the position of the tripod, the lights and the table, in case you have to move them at the end of each filming session. It’s obviously best if you can avoid moving your equipment between shoots.
- Set your camera to the maximum resolution and choose an aspect ratio that fits to format of your film. The aspect ratio will normally be 16:9.
If your camera doesn’t support a 16:9 aspect ratio, you can either produce the film in 4:3 aspect ratio or crop the 4:3 images to 16:9 aspect ratio during post-production.
If you decide to crop the pictures, bear in mind that 1/8 from the top and bottom of your images will be cut. If you place some tape across the top and bottom of your camera display (make sure it’s not too sticky), you’ll be able to see the frame you’ll end up with.
- If adjusting the white balance (WB) of your camera is an option, avoid adjusting WB automatically; this will cause the other colours in the photos to change. Adjust WB manually or use the right preset – for example ‘tungsten light’ for lights with bulbs or ‘fluorescent light’ for neon tubes and energy-saving lamps. See Camera advanced for more.
- If adjusting the shutter speed of you camera is an option, use the shutter-priority function and try to set it to at least 1/50s, to make sure the photos are sharp. Even if you’re using a tripod, it’s best to have the speed set to 1/100s so you don’t capture movements like vibrations caused by someone walking.
- If you want to blur the backdrop and focus on a specific object, set a high aperture manually. Use the aperture-priority function of your camera and keep a shutter speed of at least 1/50s. If the speed is slower than this, you’ll have to be extremely careful not to move anything when you take the photos.
- After your set is arranged, do a dry run. Move the figures around and take photos to make sure the lighting is good, and that the camera angles and movements work well.
- Start shooting. You’ll need at least eight pictures per film second to get fluid movement in the film. If it takes one second for a figure to raise an arm, there should be at least six pictures between the start and end positions of the arm movement.
- Stick to the defined framings in your storyboard, if you have one. Plan ahead so you can be efficient and you don’t have to change the camera angle too often. For example, if you want to shoot a conversation using the shot/counter-shot principle, shoot the whole conversation from the first angle, then do the same from the counter-shot angle, rather than moving the camera with every line.
- Check your photos regularly. View them on your camera or, even better, on a bigger screen; this gives you a more accurate idea of how sharp the images are.
Camera movements and racking focus
Video: 3D stop-motion animation from the series “Trickreich” (in German by WTV) containing pans and zooming
- You can complete a pan or a tilt step by step, photo by photo.
- For following shots, move the camera along with the tripod, bit by bit from left to right (or vice versa), and, if the tripod allows it, upwards or downwards. Alternatively, you could move the camera using a dolly or something similar you’ve built yourself. You can combine your following shot with a pan or a tilt, just make sure the camera moves only slightly between shots. 2
- To zoom in and out, change the focal length of your lens step by step, photo by photo.
- Doing a racking focus is also possible. First, focus on one object in the foreground; the object in the background will be blurry. Then change the focus manually step by step until the object in the background is focused and the object in front is out of focus. You’ll need a high aperture value to make sure the respective levels are blurry.
Even in video mode, a photo camera has a much higher resolution than is necessary for film. A lens with a 10 megapixel censor takes 4224px x 2376px images at 16:9 aspect ratio, whereas FullHD resolution is only 1920px x 1080px.
This means you can achieve a zooming effect or a following shot by cropping the image in post-production. If you decide to do this, make sure you factor it in the shooting process.
Sound-recording for animation
Video: Cutout animation with voice-over speech: We are what we eat (film from the project CROSSCuT in Italian)
You can record sound for your animation – whether that’s music, dialogue between characters, or a narrator’s voice-over – using any digital recording device. Find out more in Sound, music and sound effects.
Ideally, shooting will have finished and the film will have been edited by the time you ask actors to provide narration or character voices for your animation. That way they can watch the film while they dub it. But dubbing can also be done during the shooting stage; the sound is then matched to the relevant part of the film.
As well as speech, you could record different sounds and music to add to your film, or find music with a suitable copyright licence online. Find out more about sourcing music online in Free internet resources to support your video work.
Editing a stop-motion animation film
- Make a rough selection of the photos you might want to use. You can do this easily in the file browser of your computer, tablet or phone.
- Set the aspect ratio of the new film project to the aspect ratio of the photos, unless you took the photos at 4:3 aspect ratio and plan to crop them to 16:9 in the editing program.
- Import the pictures in the editing program of your choice.
- Select a sequence of photos from the program’s file browser, then drag and drop them into the timeline. Some programs like Windows Movie Maker insert the images directly into the timeline.
- If you can see only a small section of each photo, this is probably because you took the photos with a good-quality photo camera, and their resolution is higher than that of the film project. If you’re using Adobe Premiere Elements, you can fix this by selecting all the images in the timeline, then right-clicking and selecting ‘Scale to Frame Size’; other editing software will have a similar function.
You can avoid your computer slowing down by reducing the resolution of photos before you import them into the editing software. You can do this with free programs like Google Picasa and IrfanView, and professional software like Adobe Photoshop and Adobe Media Encoder.
If the import has been successful, each photo should now match up with one or more frames in the timeline, depending on the predefined value in the program.
In Adobe Premiere Elements, you can find the default length for film stills under Edit->Predefined Settings->General Settings. Some programs, including Windows Movie Maker, don’t have a preset value, and you’ll have to type in the value manually – for example 0.3s per image.
If you want a photo to be viewed longer than the period in the predefined value, you can extend its duration manually in the same way as you would prolong a film sequence again after it’s been cut.
If the transition between a whole series of images is too fast, you can slow down the group by selecting all the relevant photos and right-clicking->endure duration
Beyond this, stop-motion animations are edited in the same way as conventional videos. You can add special transitions, effects, sounds, dialogue and music under the respective video tracks. Use titles for the opening and end credits, or for dialogues if you don’t want to dub the film.
Re-framing, zooming, and creating camera movement during editing
If the resolution of the source image material is much higher than the resolution of the film project, you can choose to only use a section of some images and thus achieve a particular effect.
For example, selecting a small section of the image changes the framing of a shot. You can also enlarge/minimise an image section frame by frame to achieve a zoom-in or zoom-out effect.
Finally, it’s possible to create a following shot by cropping a larger image into smaller, consecutive sections of equal size. These can then be ordered from left to right/right to left for a horizontal following shot, or upwards/downwards for a vertical following shot. 3
When you’re cropping a larger photo, make sure that the resolution of the resulting small images is high enough for the film project. Otherwise they will look pixellated.
Common mistakes
- Moving the figures or objects too far for each shot. This means that the movement in the film won’t be fluid enough. Be patient and check your photos regularly to see if you need to re-shoot any scenes.
- The warmth of the lights weakens the stability of figures made out of modelling clay. You can make your figures more stable by modelling them around a wire ‘skeleton’.
- Not finishing a scene in one session. When this happens and you have to move your equipment, it’s very difficult to restore the set-up exactly as it was – including the camera angle, lights, and the position of figures and props. If an interruption can’t be avoided, change the camera angle and don’t try to replicate the same conditions. Remember to always mark the positions of the tripod and the lights if they can’t stay in the room until the next shooting session.
Exercises
- Look at the films in this chapter and search the web for other stop-motion animations.
- Invent a story/topic that you want to base your animation on, or pick/modify an existing one. You might be able to find an animated-film competition that focuses on that specific topic.
- Make a list of the materials and technical resources you have. See if you can borrow equipment from friends or media educational institutions.
- Produce your own animation, either by yourself or with friends. You might want to start with a cut-out animation film, or use toys, so that you don’t have to make figures and props for your first project.
Related topics and links to external sources
Chapters: Camera basics / Camera advanced / Basics of lighting / Film structure / Sound, music and sound effects / Film editing
Methodology
Don’t underestimate how long it can take to produce a stop-motion animation. It all depends on how much time you’ll need to make your figures, props and sets. If you don’t have much time, make a 2D cut-out video instead of a 3D animation film.
Whichever style you choose, write a clear timetable that sets out when each part of the film-making process will be completed by. This will help not only you but the young people as well, who will need to know how much time they have. Create the timetable in the form of a large poster and hang it on the wall where the project is taking place. You won’t be able to predict everything, of course, but a basic schedule will help you a lot.
It’s also important to define the end result: including the type of production (cut-out or 3D animation); length; what the figures, props and backgrounds should look like and how they should be created; the film’s aesthetics, effects, framing types, fluidity of movement, camera angles and effects; sound and the editing. Remember that the quality of the story can affect the final product too.
Talk to the young people and find out how much effort they are prepared to put in. Use this to decide on the right project – one that challenges them but doesn’t overburden them. The examples at the beginning of this chapter each required a different level of effort, and could help with your decision.
Work in small groups of 2–4 people. Most of the time the shooting process needs just two young people – one to move the figures and the other to shoot the pictures. The other young people in the team will need other tasks, for example recording the voice-over, sounds and music.